Defining a Connection
To support scheduling Airflow jobs, you need to define connections between a TA Master and one or more Airflow Servers. The Tidal Automation Adapter for Apache Airflow supports these methods for authenticating connections with Airflow Servers:
-
Airflow credentials
This authentication method relies on user name and password credentials specified for TA runtime users, as described in Authorizing TA users to run Airflow jobs.
-
Google Identity and Access Management (IAM) using Google Cloud Service accounts
This method authenticates a connection using Google Cloud Service accounts for managing application identities. Tidal supports the JSON and P12 key types for the Google Cloud Service accounts.
Note: When using Google Service Accounts, install and deploy the Tidal DAG, as described in Installing Tidal Automation adapter for Apache Airflow.
When specifying Airflow-specific information in the Airflow tab, you:
-
Identify the URL for the Airflow Server.
-
Choose the method for authenticating the connection to the Airflow Server.
-
Specify the necessary credentials for the selected authentication method.
You configure an Airflow connection with the Airflow Connection Definition dialog.
The Airflow Connection Definition dialog contains these tabs and parameters.
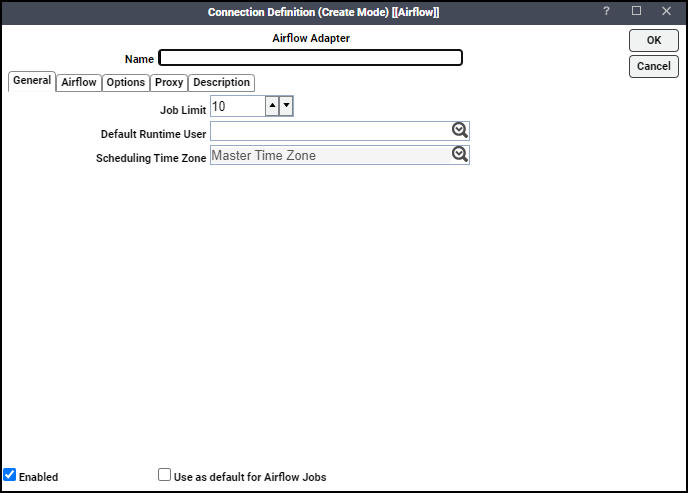
General tab
-
Name – Name for this Airflow connection.
Note: Refrain from using spaces in the Name field for the correct functionality.
-
Job Limit – Maximum number of concurrent active processes that TA should submit to the Process Scheduler on this server at one time. This number will be checked and enforced by TA prior to job launch.
-
Default Runtime User – Name of a runtime user (Operator ID) for Airflow jobs. Only users that have been defined with Airflow passwords appear in the list. Use an Airflow operator ID as the runtime user.
-
Scheduling Time Zone – Time zone to use for scheduling jobs (default is Master Time Zone).
-
Enabled – Whether to activate the connection. Choose the checkbox to enable (default) or unselect the checkbox to disable (deactivate) the connection, which shuts down the adapter. A job cannot run on an adapter if its connection is disabled. If jobs try to run on a disabled connection, the job enters Agent Disabled status. Jobs already running on an agent that is disabled (or if the connection to the agent is lost) run to completion; however, their completion status is not returned until the agent is enabled.
-
Use as default for Airflow Jobs – Whether to use the connection as your default connection when setting up future Airflow jobs. The checkbox is selected by default.
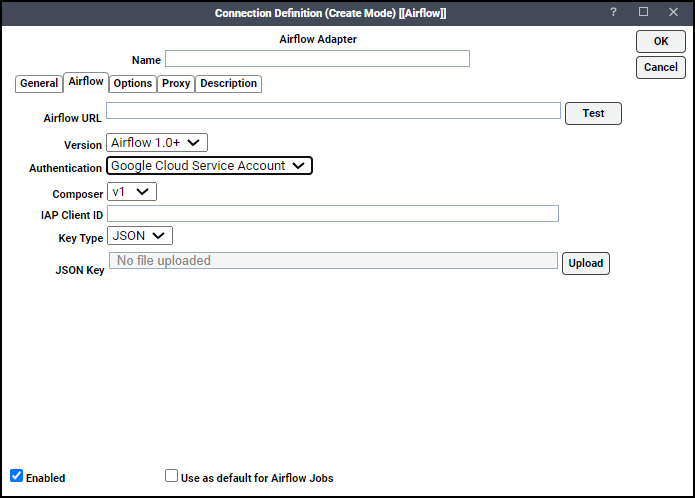
Airflow tab
Note: If you use Airflow Composer 2.6.4 or attempt to connect after upgrading to Airflow Composer 2.6.4 and get HTTP/1.1 500 INTERNAL SERVER ERROR, navigate to the Cloud Composer and check if the expose_config parameter is set to true. If it is not, override the default value or add this property to the airflow config.
-
Airflow URL – Hostname or IP address the Airflow Server.
-
Version – Software version running on the selected Airflow Server. Possible values include:
Airflow 1.0+
Airflow 2.0+
-
Authentication – Type of authentication to use when connecting to the Airflow Server. Possible values include:
Airflow credentials
Google Cloud Service Account
Note: Based on the selected authentication, additional fields are displayed. For more information about authentication, see Creating a connection using Airflow credentials, Creating a connection using a Google Cloud Service account.
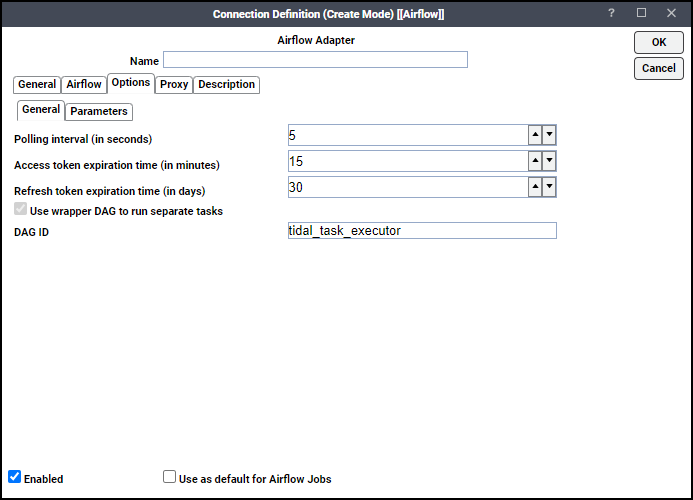
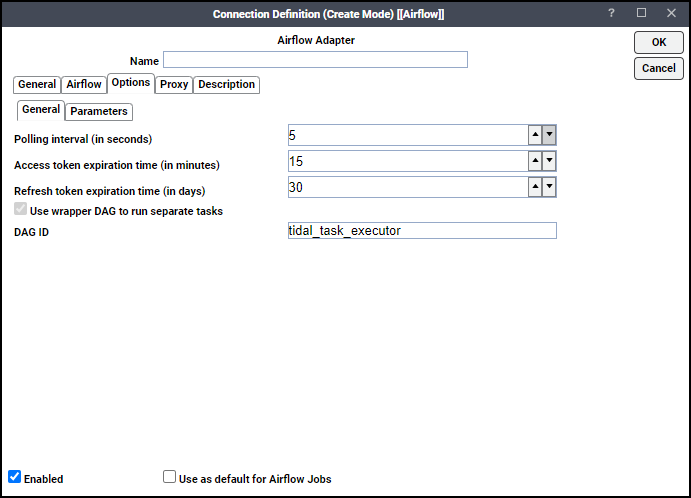
Options tab
-
Polling interval (in seconds) – How frequently to verify the Airflow connection. Access token expiration time (in minutes): Lifetime, in minutes, of an access token. Refresh token expiration time (in days): Lifetime, in days, of the refresh token.
-
Use wrapper DAG to run separate tasks – Whether to configure jobs to run separate tasks in a Tidal DAG instead of natively.
Note: This option is automatically enabled for connections that use Google Cloud Service Account authentication to support job definitions that use the Run Separate Tasks feature. For more information about running separate tasks, refer to How to define an Airflow job.
If you enable this option without using Google Cloud Service Account authentication, install the airflow_plugin_v1.py, as described in Installing Tidal Automation adapter for Apache Airflow.
-
DAG ID – Choose the Use wrapper DAG to run separate tasks option to enable the configured jobs run separate tasks in the Tidal DAG for the specified DAG ID.
-
Parameters – Optional parameter name/value pairs to pass into the Airflow DAGs.
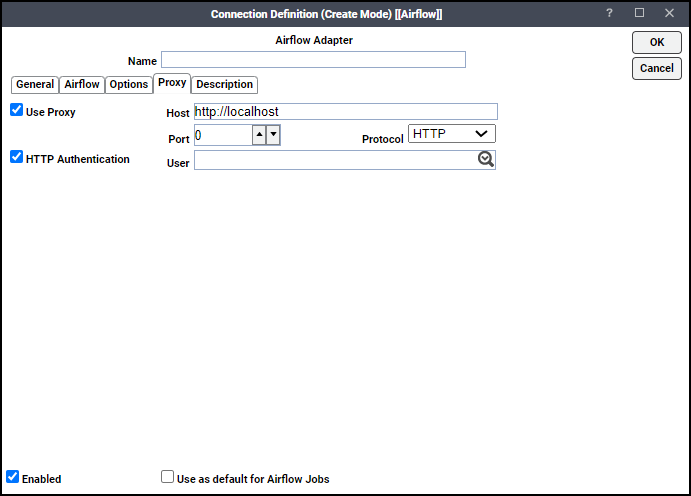
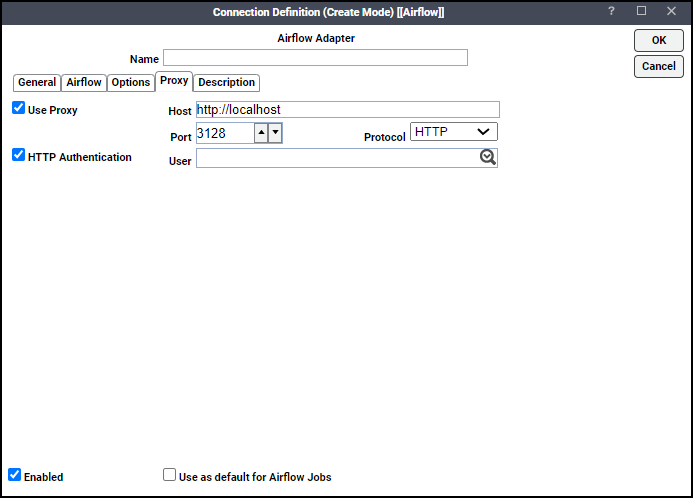
Proxy tab
The Adapter primarily uses the Apache HttpClient API to implement proxy connections.
-
Use Proxy – Whether to enable or not enable the proxy authentication for the specified runtime user.
-
Host – The host name of the proxy server.
-
Port – The port the proxy server listens on.
-
Protocol – Choose a protocol (HTTP or HTTPS) from the dropdown list for this field.
-
HTTP Authentication – Whether to allow or not allow a runtime user for proxy authentication.
-
User – The runtime user for proxy authentication.
Creating a Connection Using Airflow Credentials
To authenticate the connection to an Airflow Server using Airflow credentials, specify the information in the Airlfow tab.
-
Airflow URL – Hostname or IP address of the Airflow Server.
-
Version – Software version running on the selected Airflow Server. Possible values include: Airflow 1.0+, Airflow 2.0+.
-
Authentication – Method to use when authenticating a connection to the Airflow Server. Possible values include: Airflow credentials, Google Cloud Service Account.
-
User – User name defined in the Airflow Server.
To create a connection using Airflow credentials:
-
Click Administration > Connections on the Navigation pane to display the Connections pane.
-
Click Add and choose the Airflow Adapter option from the list of connection types, or right-click and choose Add Connection > Airflow Adapter from the shortcut menu.
-
Populate the General field values.
-
Click Airflow tab and populate the Airflow field values, as follows.
-
In the Airflow URL field, enter the URL for the Airflow Server and chooseTest to ensure the URL is valid.
-
In the Version dropdown list, choose the version of the Airflow Server.
-
In the Authentication dropdown list, choose Airflow credentials.
-
In the User dropdown list, choose the desired user name.
-
-
Click Options tab and populate the Options field values.
-
Click Proxy tab and populate the Proxy field values.
Note: If desired, click Description tab and add information about the Airflow connection.
-
Click OK on the Connection Definition dialog to save the definition.
Creating a Connection Using a Google Cloud Service Account
When creating a connection using a Google Cloud Service account, use these methods to authenticate the connection:
-
JSON key
-
P12 (also called PFW) key
Additionally, users logging in to Airflow should have a Google Cloud Service account with one or more to these roles:
-
Composer User
-
Service Account User
-
Service Account Token Creator
For more information about Google Cloud Service account roles, see Understanding service accounts.
Using Google Cloud Service JSON Key Authentication
To authenticate a Google Cloud Service account connection with a JSON key, specify the information in the Airflow tab.
-
Airflow URL – Hostname or IP address of the Airflow Server.
-
Version – Software version running on the selected Airflow Server. Possible values include: Airflow 1.0+, Airflow 2.0+.
-
Authentication – Method to use when authenticating a connection to the Airflow Server. Possible values include: Airflow credentials, Google Cloud Service Account.
-
Composer – Version of Google Composer used in Airflow. Possible values include: v1, v2, and v3.
Note: V2 and V3 are available only when the version is Airflow 2.0+.
-
IAP client ID – Unique identifier of an Identity-Aware Proxy (IAP) resource. Maximum length: 4000 characters.
Note: This field is displayed only when the Composer field value is v1.
-
Key type – Type key to use for authentication. Possible values include: JSON, P12.
-
JSON Key – File containing the JSON SSL private key to upload. The JSON key file takes this form:
Example:
{
"type": "service_account", "project_id": "my-proj-id", "private_key_id": "key-id-string},
"private_key": "------BEGIN PRIVATE KEY------\n..."
}
To create a connection using a JSON key:
-
Click Administration > Connections on the Navigation pane to display the Connections pane.
-
Click Add and choose Airflow Adapter option from the list of connection types, or right-click and choose Add Connection > Airflow Adapter from the shortcut menu.
The Connection Definition dialog is displayed with the General tab active.
-
Populate the General field values.
-
Click the Airflow tab and populate the Airflow field values, as follows.
-
In the Airflow URL field, enter the URL for the Airflow Server.
-
In the Version dropdown list, click the version of the Airflow Server.
-
In the Composer dropdown list, click the appropriate Google Composer version.
-
In the Authentication dropdown list, choose Google Cloud Service Account.
-
In the IAP client ID field, enter the unique ID of the IAP-secured resource.
Note: This field is displayed only when the Composer field value is v1.
-
In the Key type dropdown list, choose JSON.
-
In the JSON Key field, choose Upload, and choose the .json file containing the SSL private security key.
Note: Click Test to ensure the URL is valid and to validate the connection with the specified authentication.
-
-
Click the Options tab and populate the Options field values.
-
Click the Proxy tab and populate the Proxy field values.
Note: If desired, click the Description tab and add information about the Airflow connection.
-
In the Connection Definition dialog, click OK to save the definition.
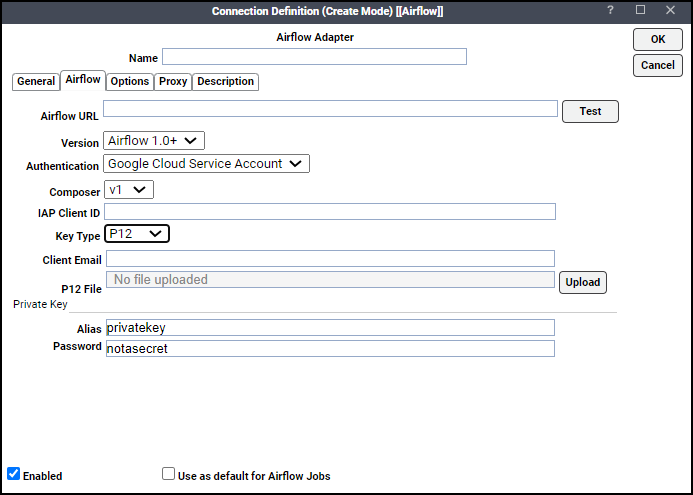
Using Google Cloud Service P12 key authentication
To authenticate the Google Cloud Service account connection with a P12 key, specify this information in the Airflow tab.
-
Airflow URL – Hostname or IP address of the Airflow Server.
-
Version – Software version running on the selected Airflow Server. Possible values include: Airflow 1.0+, Airflow 2.0+.
-
Authentication – Method to use when authenticating a connection to the Airflow Server. Possible values include: Airflow credentials, Google Cloud Service Account.
-
Composer – Version of Google Composer used in Airflow. Possible values include: v1, v2, and v3.
Note: V2 and V3 are available only when the version is Airflow 2.0+.
-
IAP client ID – Unique identifier of an IAP (identity-aware proxy) resource. Maximum length: 4000 characters.
Note: This field is displayed only when the Composer field value is v1.
-
Key type – Type key to use for authentication. Possible values include: JSON, P12.
-
Client email – Service account credentials, in the form <USER>@<PROJECT>.iam.gserviceaccount.com. For example: airflow-service-account@my-project.iam.gserviceaccount.com.
-
P12 file – P12-formatted encrypted binary file that stores a security certificate, intermediate certificates, and a private key.
-
Alias – User-defined name to identify the adapter.
-
Password – Password that decrypts the P12 file.
To create a connection using a P12 key:
-
Click Administration > Connections on the Navigation pane to display the Connections pane.
-
Click Add and choose the Airflow Adapter option from the list of connection types, or right-click and choose Add Connection > Airflow Adapter from the shortcut menu.
The Connection Definition dialog is displayed with the General tab active.
-
Populate the General field values.
-
Click Airflow tab and populate the Airflow field values, as follows.
-
In the Airflow URL field, enter the URL for the Airflow Server.
-
In the Version dropdown list, choose the version of the Airflow Server.
-
In the Authentication dropdown list, choose Google Cloud Service Account.
-
In the Composer dropdown list, choose the appropriate Google Composer version.
-
In the IAP client ID field, if available, enter the unique ID of the IAP-secured resource.
Note: This field is displayed only when the Composer field value is v1.
-
In the Key type dropdown list, choose P12.
-
In the Client email field, enter the email address associated with the service account key.
-
In the P12 file field, click Upload, and choose the desired .p12 file.
Note: Click Test to ensure the URL is valid and to validate the connection with the specified authentication.
-
-
Click Options tab and populate the Options field values.
-
Click Proxy tab and populate the Proxy field values.
Note: If desired, click Description tab and add information about the Airflow connection.
-
Click OK on the Connection Definition dialog to save the definition.
Verifying Airflow Connection Status
Once you have defined an Airflow connection, the TA Master continually monitors the connection with the Airflow Server. If the Airflow connection is not available to the TA Master, the connection status indicator in the first column of the display is red. Note that this indicator is relative to the status of the connection from the TA Master. If the TA Master cannot connect or loses its connection to an Airflow Server, you will see a red status indicator next to the Airflow connection in the Connections pane.
Using the Tidal Plugin for the Adapter for Airflow 2.0
By default, the adapter uses the stable REST API when communicating with Airflow 2.0 servers. Tidal recommends using this default behavior. However, if you would rather use the Tidal plugin, you can set the AIRFLOW_API parameter to override the default behavior.
To use the plugin for Airflow 2.0:
-
Click Options tab on the Connection Definitions dialog; then choose the Parameters sub-tab.
-
Click Parameters tab.
-
Click Add to display the Parameter Definition dialog.
-
Set these values, then click OK:
-
Parameter Name: AIRFLOW_PLUGIN
-
Parameter Value: PLUGIN
The definition is added to the connection definition.

-
-
Click OK on the Connection Definition dialog, to save the definition.